(post in progress... check back soon)
In the meantime, you can check out our Flickr pics of the event.
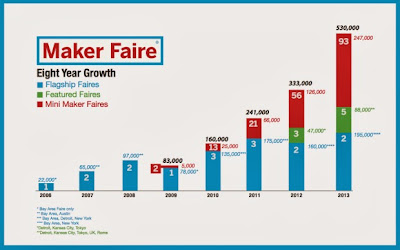
UPDATE 1.2.14: 2013's Mini-Maker Faire was one of 100 Maker Faires this year - congrats Maker Media!
Sunday, October 20, 2013

Thursday, October 10, 2013
A Day in the Life of Room 4
Today, during one of the rare quiet moments in my (currently empty) classroom, I was working steadily, soothed by the constant hum of the 3D printers.
I am not the only one who appreciates their sounds. Some of the boys have been recording sounds bytes form the printers. They want to create a 3D Printer Dubstep Remix! (Apparently, we are not alone in our Makerbot noise appreciation.)
Wednesday, October 9, 2013
Successfully Crowdfunded 3D Printers
3D Printer World has assembled a list of successfully crowdfunded consumer 3D printers. Click the image below to read more.

Here at BPC, we are partial to the Printrbot (I think it's the best printer for the the price value), and the HYREL was a treat to see at the 2013 Maker Faire. They had me at "can extrude any semi-solid material" such as air-dry clay, cookie dough, frosting, etc. The middle school kid I was with was like, "Challenge. Accepted." The Peachy Printer, new on the scene, is intriguing, but I worry about tubs of water next to a computer in a middle school classroom.
Here at BPC, we are partial to the Printrbot (I think it's the best printer for the the price value), and the HYREL was a treat to see at the 2013 Maker Faire. They had me at "can extrude any semi-solid material" such as air-dry clay, cookie dough, frosting, etc. The middle school kid I was with was like, "Challenge. Accepted." The Peachy Printer, new on the scene, is intriguing, but I worry about tubs of water next to a computer in a middle school classroom.
Tuesday, October 8, 2013
The Difference in Print Speed
A group of boys have taken over the new Printrbot at lunch time. That's fine with me, since they can teach me! Today they experimented with print speed. Both objects were printed using PLA. The item on the right of the photo was printed at regular speed; the one on the left, 200% speed. Quite a significant difference in print quality!


Repetier vs. Replicator G?
With our newest Printrbot, we have been experimenting with the (open source) Repetier software. There are some things the kids like better about it, mostly that the adjustments are easily accessible. They are constantly messing with the print speed, temperature, etc. I personally haven't seen anything on the Repetier panels that isn't under "Edit Profiles" in ReplicatorG somewhere, but I'll need more time with it to be sure.
One fun thing, however, is that Repetier visually tracks the progress of the print - great for demos!
One fun thing, however, is that Repetier visually tracks the progress of the print - great for demos!
Monday, October 7, 2013
PLA vs. ABS plastic filament
This post is about PLA vs ABS, two common thermoplastics used in 3D printers. A thermoplastic is a polymer that becomes moldable above a specific temperature, and returns to its solid state when cooled.
Popular filament types:
Here is an older (2011) video that explains the basics of ABS, PLA and PVA quite well. I would no longer say PLA is experimental, but I think the rest of the information is still accurate.
It's also worth mentioning there has been some preliminary research on emissions from 3D printers, which is worth investigating if you plan to use the material around kids. Many educators prefer using PLA over ABS for two reasons:
Here are some additional resources about these major types of plastic.
What about recycling filament?
Updated 2.27.14 by Luka.
Updated again 3.16.14 by C. Mytko.
Popular filament types:
PLA
Polylactic Acid
|
ABS
Acrylonitrile Butadiene Styrene
|
|
|
Here is an older (2011) video that explains the basics of ABS, PLA and PVA quite well. I would no longer say PLA is experimental, but I think the rest of the information is still accurate.
It's also worth mentioning there has been some preliminary research on emissions from 3D printers, which is worth investigating if you plan to use the material around kids. Many educators prefer using PLA over ABS for two reasons:
- Starch-based PLA emits fewer ultrafine particles (UFP) and many people report it having less fumes than ABS.
- ABS requires a heated build plate (more preheating time needed, often more expensive machines), while PLA does not require a heated build plate.
Here are some additional resources about these major types of plastic.
- Makerbot: About PLA
- 3Doodler: ABS vs. PLA
- MakerGeeks site (check out side bar for some of the very wide selection of filament types they sell)
- The 2014 MAKE magazine Ultimate Guide to 3D Printing has an excellent spread about filament types.
MAKE reviewed the Filabot Wee and Filastuder, for folks who want to make their own filament by grinding up cheap plastic pellets (nurdles?!) that you can purchase online for ~$5/kg and extrude them into your own spool instead of purchasing pre-made filament spools at ~$40+/kg. (Filabot plans are freely shareable under a CC license if you'd like to build your own.)
OmNom Project and Filabot’s Reclaimer grinder promise to allow you to actually recycle used filament (including failed prints!) into filament that can be fed back into the machine. The only concern with this is that there is a high risk of contamination by dirt and everything else.
SLS does in fact feel like it is the future of reliable 3D printing and material recycling, since the unused powder can be reused in future prints.
Updated 2.27.14 by Luka.
Updated again 3.16.14 by C. Mytko.
Saturday, October 5, 2013
What's in our dock for Maker Club?
One month into our Maker Monday adventures, I think we have assembled a collection of useful tools (for us). This post (as many of the posts on this blog) is evolving as we learn more.

On the dock:
On the desktop:
Things to add:

On the dock:
- iTunes - after all, they *are* middle school kids
- Internet Browser(s)
- FIJI - Fiji Is Just Image J - hopefully to process stacks of scan data
- MeshLab -
- Netfabb basic -
- Repetier -
- ReplicatorG -
- SketchUp -
- Arduino -
- Scratch -
On the desktop:
- A folder named "Student Projects." Inside, each student has a folder to store non-cloud-based work.
- Bookmark to Tinkercad
- Bookmark to Thingiverse
Things to add:
- Kinect software - Skanect, ReconstructMe, others?
- Autodesk Inventor
- Snap! -
- MeshMixer -
Generating G-Code in Replicator G
As we wait for the status bar to indicate our stl file has been sliced and is ready to send to the printer, I am often wondering, what is ReplicatorG doing?! In the terminal, we can read that it is going through the steps to "generate the toolpath," which creates the directions that explain how to the extruder needs to move in order to print the object. Replicator G uses Skeinforge, a tool chain composed of Python scripts that converts your 3D model into gcode, to get the job done.
We've figured out that these are the steps that most often occur in generating the gcode include: Carve -> Preface -> Inset -> Fill -> Speed -> Raft -> Jitter -> Comb -> Cool -> Dimension -> Alteration -> Export. Here's an example from a (class-favorite) duck from Thingiverse:
[10:59:33] Carve procedure took 8 seconds.
[10:59:34] Preface procedure took 1 second.
[11:00:33] Inset procedure took 14 seconds.
[11:00:33] Fill procedure took 45 seconds.
[11:00:34] Speed procedure took 1 second.
[11:00:36] Raft procedure took 2 seconds.
[11:00:37] Jitter procedure took 1 second.
[11:00:38] Comb procedure took 1 second.
[11:00:42] Cool procedure took 4 seconds.
[11:00:44] Dimension procedure took 2 seconds.
[11:00:44] Alteration procedure took 0 seconds.
 It's pretty easy to generate the Gcode. In fact, all we do is click "Generate gcode," check a few parameters (like which extruder, whether we want a raft or support material, and percent fill), and then the program does the rest.
In researching this toolpath, I've read the entire sequence could be: Carve -> Scale -> Bottom -> Preface -> Widen -> Inset -> Fill -> Multiply -> Speed -> Temperature -> Raft -> Skirt -> Chamber -> Tower -> Jitter -> Clip -> Smooth -> Stretch -> Skin -> Comb -> Cool -> Hop -> Wipe -> Oozebane -> Dwindle -> Splodge -> Home -> Lash -> Fillet -> Limit -> Unpause -> Dimension -> Alteration -> Export
 All of a sudden, we made a connection! When you "edit slicing profiles" (pictured left) you get the a python popup with a variety of options. These correspond to the "craft" parameters. We usually leave everything at the default settings except, of course, when we want to make multiple ducks. :)

So, what are all these steps? Here is our research so far: (Still in progress... but I think my favorite so far is oozebane!)

Thanks to the following blogs for help defining these terms: The 3D Printer, Skeinforge for RepMan, Makerbot's ReplicatorG support page, Skeinforge Craft.
More examples of toolpath generation progress:
iPad stand - large-sized, 20% fill
Boiling Chip - medium-sized, 15% fill
[06:52:21] Carve procedure took 11 minutes 32 seconds.
[07:03:53] Preface procedure took 12 seconds.
[07:12:19] Inset procedure took 8 minutes 27 seconds.
[07:24:14] Fill procedure took 11 minutes 55 seconds.
[07:24:24] Speed procedure took 10 seconds.
[07:29:31] Raft procedure took 5 minutes 7 seconds.
[07:29:51] Jitter procedure took 20 seconds.
[07:31:11] Comb procedure took 1 minute 20 seconds.
[07:32:09] Cool procedure took 58 seconds.
[07:32:44] Dimension procedure took 35 seconds.
[07:32:51] Alteration procedure took 6 seconds.
[07:33:20] The exported file is saved as <snip>
[07:33:20] It took 41 minutes 10 seconds to export the file.
We've figured out that these are the steps that most often occur in generating the gcode include: Carve -> Preface -> Inset -> Fill -> Speed -> Raft -> Jitter -> Comb -> Cool -> Dimension -> Alteration -> Export. Here's an example from a (class-favorite) duck from Thingiverse:
[10:59:33] Carve procedure took 8 seconds.
[10:59:34] Preface procedure took 1 second.
[11:00:33] Inset procedure took 14 seconds.
[11:00:33] Fill procedure took 45 seconds.
[11:00:34] Speed procedure took 1 second.
[11:00:36] Raft procedure took 2 seconds.
[11:00:37] Jitter procedure took 1 second.
[11:00:38] Comb procedure took 1 second.
[11:00:42] Cool procedure took 4 seconds.
[11:00:44] Dimension procedure took 2 seconds.
[11:00:44] Alteration procedure took 0 seconds.
(Scroll down for more examples)

In researching this toolpath, I've read the entire sequence could be: Carve -> Scale -> Bottom -> Preface -> Widen -> Inset -> Fill -> Multiply -> Speed -> Temperature -> Raft -> Skirt -> Chamber -> Tower -> Jitter -> Clip -> Smooth -> Stretch -> Skin -> Comb -> Cool -> Hop -> Wipe -> Oozebane -> Dwindle -> Splodge -> Home -> Lash -> Fillet -> Limit -> Unpause -> Dimension -> Alteration -> Export


So, what are all these steps? Here is our research so far: (Still in progress... but I think my favorite so far is oozebane!)
- Carve -> Defines characteristics of the printer, such as mesh type and layer thickness. Thin layers improve the resolution of your print, but will significantly increase your print time,
- Scale -> Scales the output
- Bottom -> Controls the height of the lowest layer.
- Preface ->
- Widen -> Widen walls which are less than a double perimeter width wide.
- Inset -> Defines the inset.
- Fill -> Defines how an object should be filled.
- Multiply -> Print many objects at once.
- Speed -> This script is to set the feed rate and flow rate. The resulting thickness of the filament is a combination of feed rate, flow rate, and temperature.
- Temperature ->
- Raft -> A raft provides a few initial layers laid down before the object itself. A raft is optional, but often helps the object stick to the printbed (esp. with ABS)
- Skirt -> This is an outline around the object (or raft) before the initial layer to get things extruding correctly.
- Chamber -> This is to control bed and chamber temperature.
- Tower ->
- Jitter -> Jitters the loop end position to a different place on each layer to prevent the a ridge from from being created on the side of the object. This tool will change where the layer start - for each layer. As result, you won't see vertical lines up the side of your print.
- Clip -> Clip stops extrusions early in order to prevent plastic bumps at the end of a loop.
- Smooth -> Smooths jagged extruder paths.
- Stretch -> "Stretch is very important Skeinforge plugin that allows you to compensate for the fact that holes are smaller then they should be." (?)
- Skin -> Smooth the surface skin.
- Comb -> "Moves the extruder around inside holes to prevent stringers in those holes." (Not that I know what that means at all...)
- Cool -> Cool is about giving each layer a little time to cool off before you put the next layer down on top of it.
- Hop -> Raises the extruder when it is not extruding.
- Wipe ->
- Oozebane -> Control oozing.
- Dwindle ->
- Splodge -> Turn on extruder "a bit earlier". (?)
- Home -> Home the tool at beginning of each layer.
- Lash ->
- Fillet -> Rounding of corners
- Limit -> Sets limit on feed rates.
- Unpause ->
- Dimension -> "5D option for Skeinforge" (Again, not sure what that means.)
- Alteration -> Adds the start and end files.
- Export - >

Thanks to the following blogs for help defining these terms: The 3D Printer, Skeinforge for RepMan, Makerbot's ReplicatorG support page, Skeinforge Craft.
More examples of toolpath generation progress:
iPad stand - large-sized, 20% fill
[23:11:19] Carve procedure took 1 second.
[23:11:20] Preface procedure took 0 seconds.
[23:13:30] Inset procedure took 2 minutes 10 seconds.
[00:00:51] Fill procedure took 47 minutes 21 seconds.
[00:00:59] Speed procedure took 8 seconds.
[00:01:25] Raft procedure took 26 seconds.
[00:01:35] Jitter procedure took 10 seconds.
[00:01:46] Comb procedure took 11 seconds.
[00:02:31] Cool procedure took 44 seconds.
[00:02:49] Dimension procedure took 19 seconds.
[00:02:54] Alteration procedure took 4 seconds.
[00:03:19] The exported file is saved as <snip>
[00:03:19] It took 52 minutes 1 second to export the file.
Boiling Chip - medium-sized, 15% fill
[06:52:21] Carve procedure took 11 minutes 32 seconds.
[07:03:53] Preface procedure took 12 seconds.
[07:12:19] Inset procedure took 8 minutes 27 seconds.
[07:24:14] Fill procedure took 11 minutes 55 seconds.
[07:24:24] Speed procedure took 10 seconds.
[07:29:31] Raft procedure took 5 minutes 7 seconds.
[07:29:51] Jitter procedure took 20 seconds.
[07:31:11] Comb procedure took 1 minute 20 seconds.
[07:32:09] Cool procedure took 58 seconds.
[07:32:44] Dimension procedure took 35 seconds.
[07:32:51] Alteration procedure took 6 seconds.
[07:33:20] The exported file is saved as <snip>
[07:33:20] It took 41 minutes 10 seconds to export the file.
Friday, October 4, 2013


Tuesday, October 1, 2013
What can you do with a Kinect?
Things we are currently investigating (in progress)
Program the Microsoft Kinect with Scratch.
http://scratch.saorog.com/
http://calicoproject.org/Calico_Kinect
http://openkinect.org/wiki/Main_Page
Program the Microsoft Kinect with Scratch.
http://scratch.saorog.com/
http://calicoproject.org/Calico_Kinect
http://openkinect.org/wiki/Main_Page
Subscribe to:
Posts (Atom)