Showing posts with label Software and Programs. Show all posts

Friday, May 25, 2018

Chicken VR at the Maker Faire

[UPDATE 10.15.18: Chicken VR is now available on Steam. Note that you will need an HTC Vive in order to play it.]

One week ago, we loaded our rented van with kids, chicken crafts, and our HTC Vive, and headed off to the San Mateo Maker Faire. Sunday night we returned with far fewer button-making materials, tired and happy kids, and an Editor's Choice blue ribbon for our project, Chicken VR!


First, a little backstory on Chicken VR: 

At Black Pine Circle School, we're obsessed with chickens. In the science room, there is a chicken calendar, multiple chicken posters, and each of our non-Chromebook computers are named after chicken breeds. The 7th grade science class hatches chickens just about every year, but these birds usually are returned to the farm after a couple of weeks. Until last year, when the garden educator and some students got together to build a chicken coop. After a 2017-year end ceremony, we now have chickens living on campus.


When we were brainstorming for East Bay Mini Maker Faire, we wanted something chicken-related, but also tech-related, with a maker element. We had recently bought our HTC Vive (a few months ago) and wanted to learn more about developing software for it. This is how we got the idea for Chicken VR. It's a first person chicken simulator in virtual reality. You can walk around, eat, drink, and lay eggs.


Our first step was research. 

As with any good project, we wanted to see what was already out there. We searched the Internet and was momentarily crushed to discover that a Oculus Rift Chicken Simulator already existed!  Though it has some really interesting features, we knew we wanted to personalize our first-person chicken experience to match our chickens at BPC.  Plus, the Vive would allow users to walk around in real space, instead of having to sit in a chair.

Another project, Second Livestock,  from Iowa State University assistant professor Austin Stewart "imagines how VR goggles could make chickens believe they’re free-range, even when they’re not. They can explore a virtual grassland, and with future iterations of Oculus, even peck at the ground and bob their heads around to take in the landscape at different angles." (via TechCrunch) Strange, right?

There is also a Virtual Chicken Coop, "the most realistic chicken coop simulator on scratch, currently featuring 10 different breeds of chickens!"

But, we believed we had something different. Besides, can there be too much Chicken VR?

Building Chicken VR

Originally, we brainstormed a design where the trackers would actually be your feet. However, we realized that if we wanted users to teleport, this presents a problem. We thought about getting four controllers, and eventually settled on the design with two controllers held in hands.

We used TinkerCAD to create the wings out of simple shapes. These wings are attached to the controllers and you can flap and teleport. We used Fusion 360 to create the virtual model modeled off our actual school coop.


Designing the coop in Fusion 360
Finally, we used Unity to design the environment, adding terrain and taking full advantage of the "Mass Place Trees" button before applying various textures to complete the look. We worked on the physics of the wings and eventually added rotation to body movement and made sure the body resizes based on head height to accommodate a wide range of users. 

We added teleportation and a health, water, and food system with HealthTracker script. In Chicken VR 1.0 (which we brought to the East Bay Mini Maker Faire) when the beak touched food or water, your scores would increase and there was a dehydration timer involved as well as a health loss if food or water is empty.


Version 1: 2017 East Bay Mini-Maker Faire

We showed an initial prototype version at East Bay Mini Maker Faire and got feedback from a survey. Some of the responses were "interesting..." Here are some examples:
  • It should be less 3d
  • Make it more reelistik
  • You should be abel to lay eggs
  • Other chicken friends for me to be with
  • Sounds


Version 2: 2018 San Mateo Maker Faire

Before Bay Area Maker Faire (a few weeks before), we removed the health, food, and water tracking systems and added some new features. Now you can lay eggs when you pull the trigger and fly. There's even a purple hand that follows you around and feeds you a worm periodically. There are new sounds, which include "chicken eating," "chicken drinking," "chicken background," "slurp," and "flap."

Besides Chicken VR (which often had long lines) the maker club kids had additional chicken crafts available. People could make chicken buttons, or other chicken-related crafts. The button backgrounds came from a coloring book titled Exotic Chickens: Coloring for Everyone (Creative Stress Relieving Adult Coloring Book Series). The button machines were, as usual, a big hit with kids and adults alike.


We had a great weekend helping people experience what it might be like to be a chicken.

Want to keep updated on Chicken VR?  Leave your email address here. You can also "like" BPC Maker Club on Instagram and Twitter (@bpcmakerclub) and Facebook (@3dPrintinginK12). We tend to share in bursts, like on summer vacation when there is time to catch up with posts. :)


Thursday, February 23, 2017

Making Models in VR with Kodon and Gravity Sketch

Recently, I have been experimenting with making 3D models in programs called Kodon and Gravity Sketch in VR. Kodon is more of a sculpting program that you get a basic shape and from there you can push/pull/smoothen a material using the controllers of the HTC Vive. Whereas Gravity Sketch is a program similar to TiltBrush, but instead of having a colored brush, it's a 3D sphere that you can draw with. Both programs are in their early developmental stages and not very close to being a complete software but are both fairly easy to use and self explanatory.

The first program we got was Kodon. It was already on Steam and was just like downloading any other games. Once I put on the headset I thought that someone was standing in front of one of the sensors because it was flashing and almost re-calibrating. It slowed down and I eventually got used to it. Its most likely due to the capabilities of our computer not being able to catch up with what the software is doing.


Another thing that was confusing was the seemingly infinite number of menus that seem to change randomly, but after a few minutes of finding my way, I was able to navigate to any screen from anywhere. It was still a bit confusing but after fiddling with some settings I understood and was able to use the controller easily. One of the settings is turning the controller around so you can use it more as a pen than a controller. It was slightly easier to use but still had its glitches. After using this for quite a while and then seeing the final result, I concluded I didn't want to use this software on this setup again. It was quite difficult. In the end, it may not look like much, but this pig-head model is my first tangible 3D model designed in virtual reality!


Then I tried Gravity Sketch which was more so what I wanted. As soon as it booted up it was very blank. Nothing at all. But the controls were surprisingly easy to figure out how to use. In a matter of minutes I was proficient in using it. As I said before, it is very similar to TiltBrush  After finding the download button I decided to start my first real project in Gravity Sketch. Making it was very easy to do and exporting and saving was easy. My one complaint of Gravity Sketch would probably be that for some reason, all the strokes are saved separately in one model, making my arch nemesis  overlapping shells. It adds one step too many between drawing to print. I need to drag it into Meshmixer and combine all objects, however when you have too many strokes (as mentioned, due to my computer's processing power), it crashes. But once I do wait for an hour for it to load, the outcome is well worth it.  I could then print it on the 3D printer and it was a very nice model. The software is very easy to use even though its in its beta stages. - Enzo, 8th grade


Saturday, July 11, 2015

Our 3D Data From the Advanced Light Source - an Update and VR!


Data Visualization Animation of Student Scanned Sample - a Claw!
The Advanced Light Source is a synchrotron, a facility that speeds up and then bends an electron beam to produce high energy x-rays. The x-rays are used by scientists to image different samples. The 8th and 7th graders at our school have gone to the ALS for the past two years and participated in different projects, including x-ray tomography and crystallography.

Data Visualization - a Feather

Based on these experiences, I wanted to delve more deeply into 3D data visualization.  In particular, I have sought to learn how to use Avizo, which allows much more advanced image processing than FIJI (the open source alternative).  One big obstacle was cost: an Avizo license sells for $5000 -- with the education discount.  I emailed Avizo and requested -- and received -- a free trial.  When I looked online for video tutorials on how to use Avizo, I could only find one or two videos. During the trial, I made several tutorial videos of my own.  I then asked Avizo to extend my trial for as long as I continue producing high-quality tutorials. They agreed and it has been a great partnership. I have now made 15 videos, which are hosted on my YouTube channel.  Currently, my tutorials have over 3,500 views and 9,450 minutes watched. 

Our School Director Trying Google Cardboard
Working our booth at the 2015 San Mateo Maker Faire, I was able to explore other makers' work and became interested in Google Cardboard, a virtual reality viewer that uses cardboard, a few lenses, and a cell phone (and app) for viewing. I saw an opportunity to use the Cardboard to display the 3D models of our class data from the Advanced Light Source in a way that would foster a compelling learning experience. I asked the people at Google’s booth if I could have the extra Google Cardboards at the end of the Faire. They agreed. When I returned home with the Cardboards, I did some research and found an app called InsiteVR, which I have used to display the models. I started off sharing the project with my teachers and fellow students.


Meeting with Scientists at the ALS
Soon after, I contacted Dula Parkinson, a beamline scientist at ALS who has been a critical supporter of both our school's work and my independent projects.  We met and talked and he is now planning to put Google Cardboards in the lobby of the Advanced Light Source to showcase for the public the amazing imaging work that is done at the ALS!

I also played around with OpenDive, "free DIY 3D VR glasses by using your 3D printer, a non-commercial project by Stefan Welker" and was able to print out my own set on our school's Makerbot!


Dive printed and ready to be assembled - just add cell phone!

I plan to continue my data visualization work and since its announcement in May 2015, have been interested in learning more about working with Google's Jump

- Sam S (9th grader in the fall, BPC Maker Club intern)

Sunday, February 8, 2015

3D Scanning With the Structure Sensor

The Structure Sensor is a versatile 3D scanner with a host of apps and programs that you can use with it. It is made by Occipital, which licensed the technology to 3D Systems as the iSense.  (Read 3DPI's review here.)  The Structure Sensor adds a infrared camera and projector and uses your iPad's camera to sense color. Since the Structure Sensor's SDK is public there are many programs you can use with it some of these programs include Skanect, ItSeez3D, and Structure Sensor's own collection of apps.


A Scan of  My Computer Set Up
1. Skanect: Skanect is a PC and Mac scanning software (by Occipital). It costs $129. Connecting the Structure Sensor to the software is easy, you just connect both to the same wifi network and they automatically connect if you have free app called Structure open. You see a live view of what the Structure Sensor is seeing when you are scanning. I find you can scan larger objects with Skanect than any other Structure Sensor app or program but most 3D models do not have backs which make it hard to 3D print. Skanect also works with the Kinect.


2. ItSeez3D: ItSeez3D is a iPad app that uses the Structure Sensor to capture 3D data. It creates amazing head scans but each scan needs to process in the cloud which can take about 10 minutes. ItSeez3D does take good scans of objects other than heads.


3. Structure Sensor's own apps: Structure Sensor's own apps (Room Capture, Scanner, Fetch) allow you to use your structure sensor in many ways like playing a AR game, checking how far away something is, scanning a object, or scanning a room. Lets start out with the AR game, it is called Fetch. To start, you scan a area in front of you then a cat on a hoverboard pops on to the screen and you and to move the cat around to reach the ball. The game is on top of your scan data so you can't run through a chair. You can use an app called Structure to see how far something is away or see something in infrared.
To scan rooms you use a app called Room Capture. It works pretty well but it is annoying that you have to stay in one place and not move around. Once you finish scanning you can move around your scan in the app and take measurements. You can then email the room scan to anybody as a OBJ file.


Using the Structure Sensor to scan a Yeti microphone


To scan object you can use Occipital's Scanner app. It can scan objects in color but the color are blended together and not that high resolution. To show you what you have captured the app covers it in white. You can then process your scan in the app and send it to people as a OBJ file.


- Sam (8th grade)

Tuesday, June 17, 2014

3D Printing is fun, but where is the curriculum?

3D printers seem to be popping up in schools all over, thanks in part to initiatives like Makerbot Academy.  However, not every teacher with a 3D printer in the classroom seems to know what to do with it.

UPDATE JULY 2014: Tinkerine U looks promising. You have to sign up but then presumably have access to their training guides, workshops, etc.

ORIGINAL POST: For a long time, the only curriculum I was aware of was SeeMeCNC's SeeMeEducate developed by a passionate high school teacher working with Orion's Delta Printers.  It is pretty cool, you can check it out here.

Since then, 3D Systems has gotten in the curricular resources game with Cubify Education, hoping to be your "one stop shop for tutorials, curriculum, projects and educational information, materials and resources."  While it seems to have a ways to go, there is some potential here if they can garner critical mass.

Makerbot is also sniffing around and looking to teachers to flesh out their educational resources network.

Then, SME (Formerly the Society of Manufacturing Engineers) and 3D Systems recently (6.11.14) announced their new M.Lab21 initiative.  Together, they hope to "bring school workshops into the 21st century with cutting-edge equipment."  3D Systems is providing materials for participating schools, which "feature the latest in 3D design and 3D printing technology, including the Sense 3D scanner, the Touch haptic and prosumer desktop 3D printers, in addition to a suite of Cubify 3D design software [including Sculpt, Invent, and Design."  By mid-summer 2014, the M.Lab21 project hopes to have secured eight industry advisers who can provide leadership and guidance though the development process.


Also launched recently, Printrbot Learn is another initiative sponsored by Printrbot and run by teachers.  They, too, need to build a community, but I really do believe Brook Drumm, founder, has his heart in the right place and has always been a supporter of getting 3D printing into the hands of kids.
We believe that learning should be hands on. We believe that kids should solve real problems using real tools. We believe every kid should be a designer, a maker and an inventor. We believe that kids should Learn by Making.
Headed by teachers, Josh Ajima and Clarence Fisher, Printrbot Learn intends to host tutorials and lesson plans (and contests!) for teachers to implement the technology in their classrooms.

And, of course, the first book has just been released, The Invent To Learn Guide to 3D Printing in the Classroom: Recipes for Success by David Thornburg (and more).  I just picked up a copy and look forward to reading it.

Here are some other resources you can check out if you are interested in learning more about how educators are already using 3D printing in their classrooms:


What are some of your favorite 3D printer curricular resources?

Saturday, May 10, 2014

Text-To-3D model program

A Text-to-3D model program allows anyone to search a 3D model program with a term like
'bench,' or 'room with windows,' and get a 3D model of the basic geometry.

There are limits, like if you look up a model not in the database, it's game over. The available things right now are mostly architectural features.  The database could connect with other databases, like Thingiverse, to add more available objects.

I think that a program like this will probably be frustratingly limited, because without several descriptions and a very complete tagging system, the program will be hard to get what you want from. Here is a demo, and here is another article.


An example of some of the things in the database 

- By Jane, 7th grade

Friday, April 11, 2014

How to use Autodesk 123D Catch to Scan an Object

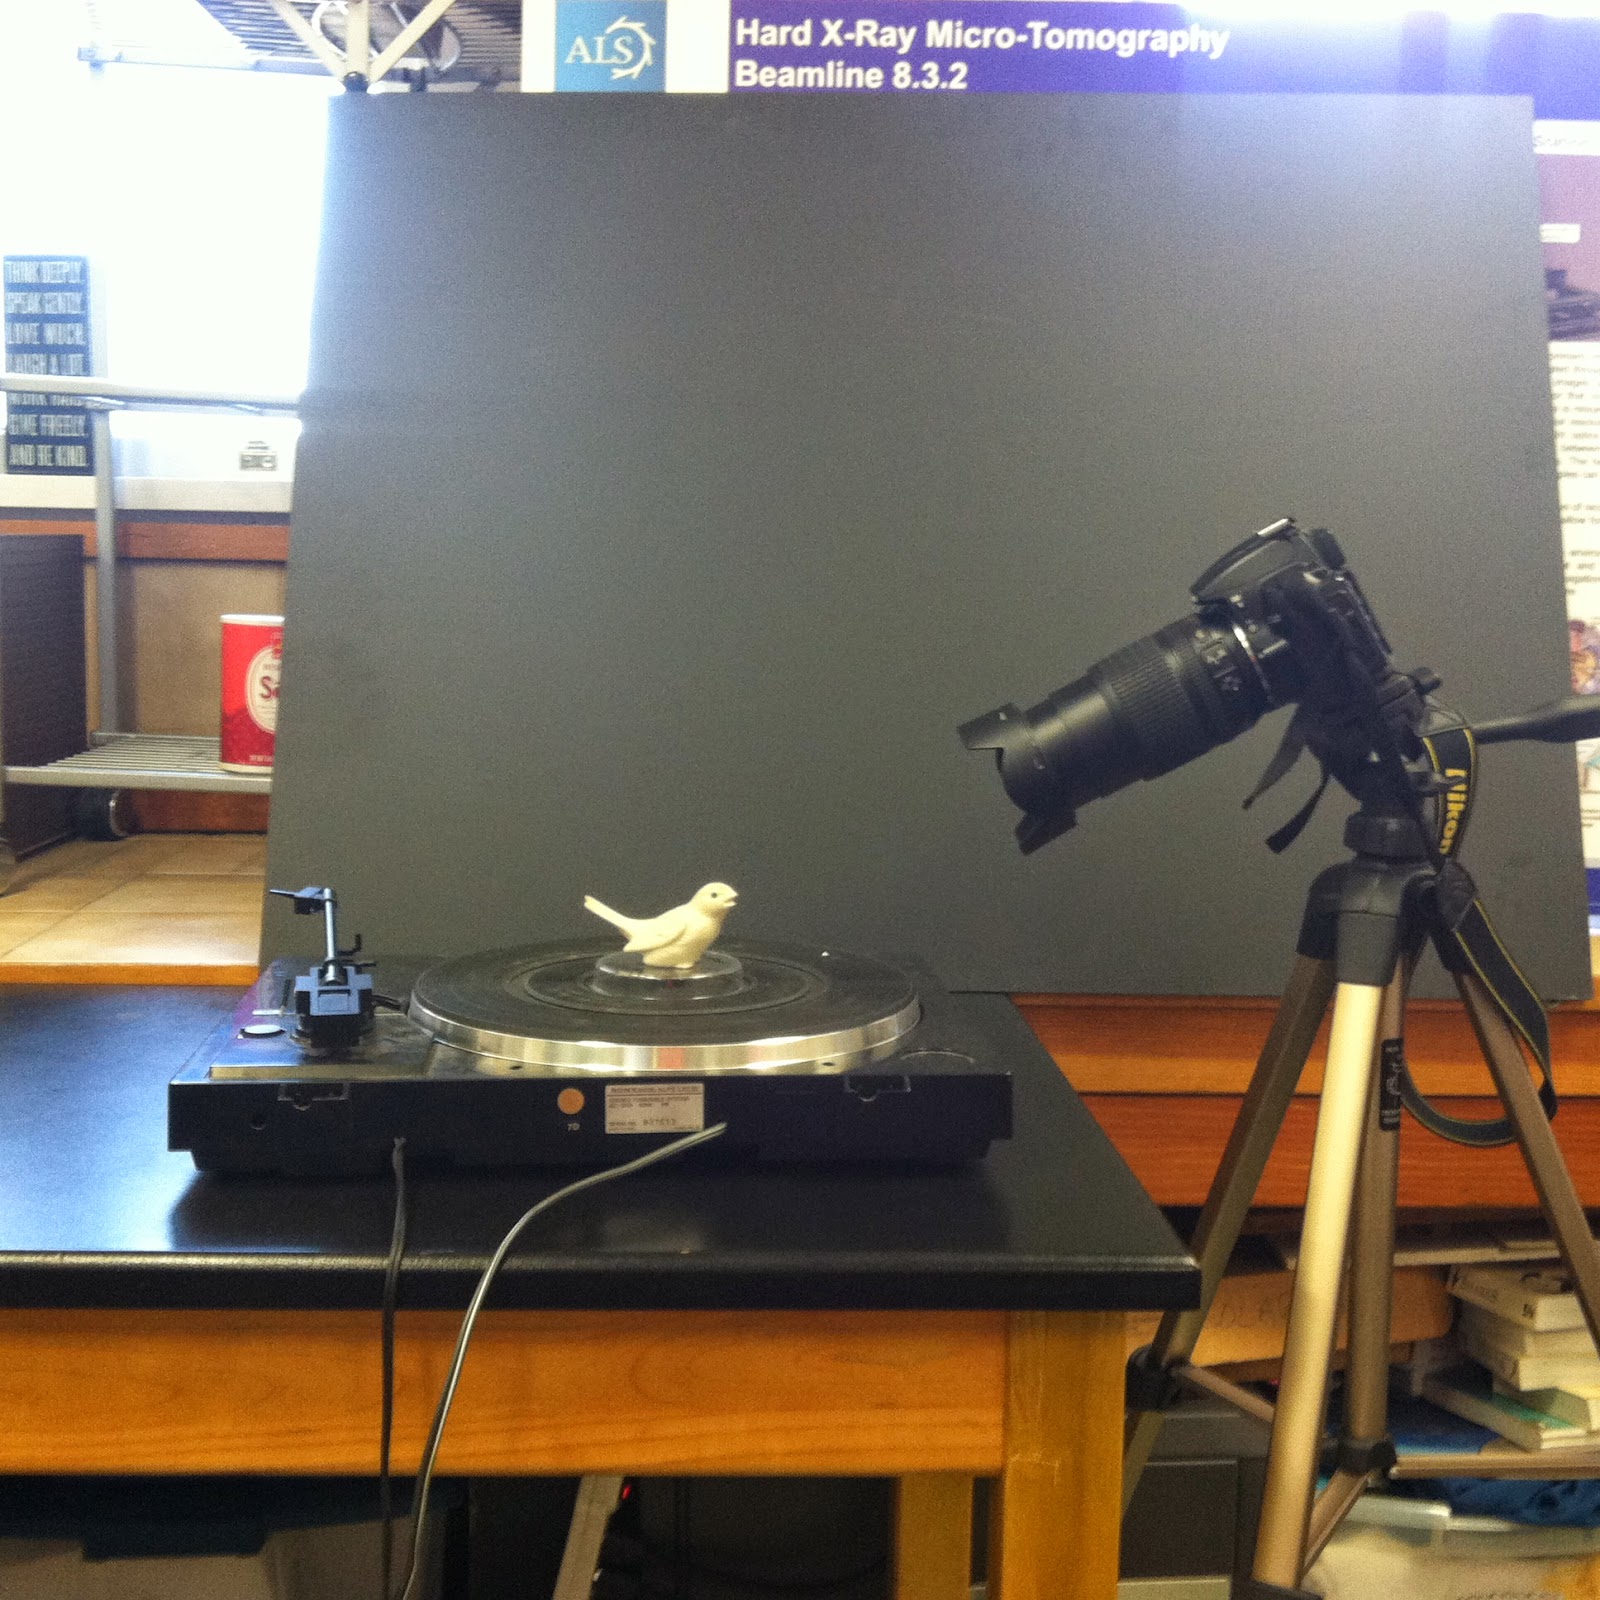
1. You need something that can spin with an object on it like a record player,  a camera and a tripod. You will also need a computer with a web browser that supports WebGL and an internet connection.

2. Make sure to take the exact number of photos specified because 123D Catch only allows you to upload up to 70 photos. Take 30 photos at a 45 degree angle of the object while spinning it. (see picture on the right)
3. Take 20 more photos at a more elevated angle while spinning the object. (see photo on the left)


4. Take 20 more photos at a low angle while spinning the object. (see picture on the right)
5. Upload the photos to Autodesk 123D Catch App.
6. Wait for Autodesk to process the photos.
7. Select and Delete any unwanted objects in the photos.
8. Then Select File>>Download as an STL.
9. Print on your 3-D printer.


Don't worry if your first try doesn't work.  Try again. In my experience,  it works 50% of the time.
Here are pictures of the completed scan:


Thursday, April 10, 2014

Tips for 123D Catch

We "recently" got an iPad air and have started downloading scanning apps. The one I'm using right now is called 123D Catch a free 3D scanning app from Autodesk. You take multiple pictures at many angles and it puts them all together to make a 3D image. The Styrofoam head I scanned turned out to look a bit like a mask. Still, not bad for a 2nd try (the first was of someones head. It failed). 123D Catch uses photogrametry to work which is using triangulation to find the XYZ coordinates of a voxel.

We also tried using a DLSR camera.to take 70 pictures of a Jackel and then turn it into a 3-D model using 123D-Catch. We got a pretty good 3-D model(on the right).

The next time we tried, we used a record player to spin a bird and took 70 pictures at 3 angles. We got a perfect 3-D model!

- By Sam and Luka (6th grade)

Wednesday, February 12, 2014

Converting .tiff data to .stl file

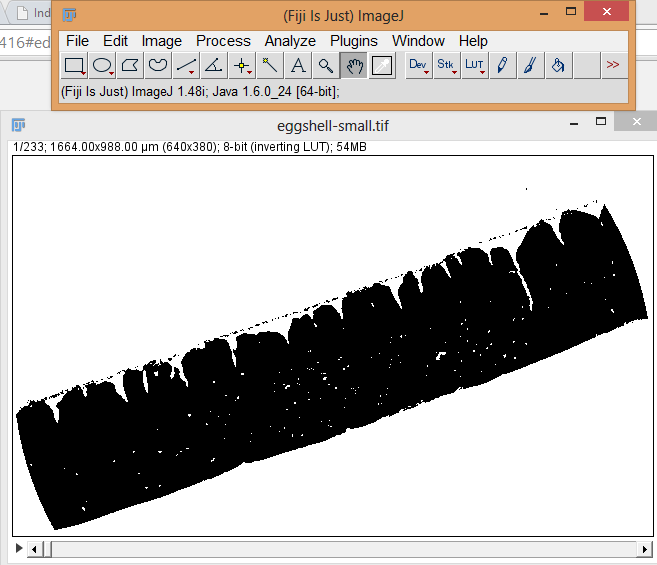
In December we went to the Advanced Light Source as a field trip. We scanned many items at the synchrotron. One item we scanned was an egg shell. While the image we can see on the screen is cool (right), a model we could touch is better!  We just got multi-image TIFF files as a stack back and, in order to make a model, we needed to turn the stack of 2D images into an STL file to 3D print. We did this using Fiji, and image processing package.


Here are the steps we took:

1.You start out by going to FILE >> OPEN. and opening the tiff stack.


2. Then you create a binary from the tiff stack by going to PROCESS >> BINARY >> MAKE BINARY

It turns into this

3. If your model has holes in it that you want to fill you can go to PROCESS >> BINARY >> FILL HOLES.  If your model still has holes then repeat step 3.


4. If you want to make your file smaller then go to PROCESS >> BINARY >> DILATE it will condense 4 pixels to 1 pixels. If you want it super small keep repeating step 4.


5. If their are stray pixels then go to PROCESS >> BINARY >> ERODE. If there are still pixels repeat step 5.


6. Once you complete steps 3-5 you go to PLUGINS >> 3D VIEWER. Don't worry if your computer freezes; this is a complicated process. A new window should come up.


7. To create the 3D surface you go to EDIT on the new window >> DISPLAY >> SURFACE Don't worry if your computer freezes; this is a complicated process. You should now have a 3D model!


8. To export you go to FILE >> EXPORT SURFACES >> STL(BINARYorASCII)

That is how you take an TIFF stack and covert it to an STL. I took the STL file and put into the Cube software but you can do what ever you want. NOTE: MOST PRINTERS CAN ONLY HANDLE FILES LESS THAN 50 MB.  (If your file is too big, you can simplify / decimate it in MeshLab.)


Finally, here is a print of our first converted data (below): half of a bean that was previously home to a Bean weevil (Callosobruchus maculatus).  That's actual data!  Though this is not a picture of the exact bean we scanned, the image to the right will give you an idea of what the original looked like.  (We are claiming Fair Use on the use of this image!)  We are excited to print more, including the eggshell described above.


(screenshot of reconstructed data from a different, not open-source software)