We will be presenting "Black Pine Circle School 3D Prints Data & Designs" at this year's Maker Faire - come join us? :)
 >
>
Friday, February 28, 2014
Thursday, February 27, 2014
#tbt The origins of 3D printing at BPC
 |
| Rep Rap Mendel (Wikipedia) |
However, the skill-level needed to assemble a kit and the cost of a pre-assembled machine both seemed like formidable barriers to difficult to overcome. However, I had some students who believed that anything was possible (especially when they are spending other people's money...). One student in particular, Adam, was determined to talk me into buying one. Knowing that our skill level combined was still lacking, I opted to find a way to bring the price down to a reasonable amount. I began attending all the tech events I could and networking... after all, you never know who you might meet! I even sprung for some Office Depot-printed business cards. :)
After a few years of opportunistic networking and Adam's logic as to why we *needed* a 3D printer at school, I attended the NextGen Science Fair in 2011. Here I met Brook Drumm and he would become instrumental in helping us begin our 3D printing journey. Brook had his new 3D printer on Kickstarter, with the goal of "a printer in every home (and school)."
Adam used a page from a classroom book called Geek Logic, which uses algebra to "help" you decide such pressing issues as "Friends or girlfriend?" "Should you walk, bike or drive?" and "Should you eat something scary from the back of the fridge or just order Chinese food again?" He did the calculations for "Should you buy something or not?" and, as you can see in the illustration below, the answer was 2.912, which was clearly greater than the recommended value of 1. This only supported his belief that we should buy a 3D printer for the classroom. Adam even boxed in his answer as instructed in math class! (My favorite part of this story is that, 2 years later, Adam used his Bar Mitzvah money to buy his own Printrbot, which he assembled from a kit!)

(2011) Printrbot
Brook offered us a generous discount to get started and about the same time I was fortunate to win a teaching award, so it seemed everything was in place to purchase our first 3D printer! Brook even came down with the printer to help set it up and teach us how it worked! (You can read Printrbot's side of the story here.)
Watching the video now, I am surprised in how far we have come! Tinkering requires patience, and students can be better at taking things apart than putting them back together, so soon I wanted a more reliable machine that I the kids would not be able to take apart. A more reliable machine so that I could have the kids focus more on the CAD design and less on getting the machine to work (though this is a valuable lesson in itself).
(2013) Makerbot I - Dual Extrusion
 Finally, I purchased a Makerbot Replicator 1 with Dual Extrusion. (Not that we can get the dual extrusion to work - it's supposedly easy, but we haven't yet successfully printed a merged stl file!) The first print we made on the Makerbot was a preloaded file from the included SD card. The first modified design we printed was a pen (see "inspiration" below). Originally from Thingiverse, one of the then-6th graders was determined to create our own, personalized version.
This Makerbot (which I paid for out-of-pocket) inspired our first formal BPC 3D printing after school club in the spring of 2013. Partly to recoup some of the cost of the machine and mostly to have a sandbox environment to experiment, a small group of students and I met weekly and this blog was born! :)
(2013) Printrbot Jr. v.2
 After a wonderful summer opportunity involving 3D scanning, modeling and printing at the Advanced Light Source at the Berkeley National Labs, I was excited to learn more with my students during the 2013-2014 school year. Plus, the summer stipend made it more palatable to purchase my classroom's third 3D printer. This time, going back to our roots, we went with Brook Drumm's newly released Printrbot Jr. v.2, again with a generous discount. This gave us a chance to work with PLA, especially in light of some recent research about ABS ultra-fine particulate.
(2013) Cube 2

UPDATE 5.20.14: Just in time for Maker Faire, we received a gift of a new Printrbot Metal Simple. Read more here.
I'll let the kids share their opinions...
"The Cube is best for high-precision parts, or parts you need right away. The Makerbot is my favorite, because it balances the ease of use with the ability to control it and tinker with it." (Jane, 7th grade)
"My Favorite printer is the MakerBot because it has a good customize ability to working ratio and we still have not figured out dual extrusion so I have and end goal." (Abe, 7th grade)
[to be added]
Wednesday, February 19, 2014
Printed Scan Data: Eggshell


 |
| reconstructed data on computer |
Why an eggshell? Well, here is the abstract from the student group whose experiment involved the eggshell:
We at the Black Pine Circle Scientific Studies Division, want to scan an eggshell. Pores on the surface of the shell allow air and moisture to go through. A larger, 3D-model will provide tactile information. Designs may be made to create new housing materials, for hot, humid places. We will be beaming hard X-rays through the sample from various angles, giving us a computer model, which can be 3D-printed. This information can be studied for housing materials, to create a new type of ultra-modern house that literally breathes in places with moisture buildup.
Besides, eggshells are pretty fascinating! Scientists have known for a long time that the chicken eggshell is 95-97% calcium carbonate crystals, but it wasn't until the electron microscope came around that they discovered, "Rather than simple layers of crystals of calcium carbonate, the shell was shown to consist of a very complex type of mineral formation, with a protein matrix as its foundation." (journal article, and perhaps way more detail than you will ever need about eggshells!)
The Exploratorium states succinctly, "Bumpy and grainy in texture, an eggshell is covered with as many as 17,000 tiny pores. Eggshell is made almost entirely of calcium carbonate (CaCO3) crystals. It is a semipermeable membrane, which means that air and moisture can pass through its pores. The shell also has a thin outermost coating called the bloom or cuticle that helps keep out bacteria and dust."
Another site explains, "The outer cover of the egg, the shell comprises 10-11% of total egg weight. On an average the eggshell weighs 5-6g, with remarkable mechanical properties of breaking strength (>30N) and is 300-350 micrometer thick. This structure plays a crucial role in protecting the contents of the egg from the microbial and physical environment and in controlling the exchange of water and gases.
More research uncovered these two diagrams, which makes me think that we actually printed the eggshell "upside down" or more-accurately "inside up," revealing those mammillary layer structures that touch the inner, organic membrane! Interesting to consider.


If you are still hankering for more egg formation information, check out these videos:
Definitely check out 0:34 - 0:50 in the video below
Our printed inventory now totals:
- v.1 beetle bean scan
- v.1 eggshell scan

UPDATE 6.23.14: OUr eggshell scan has been cleaned up and made available on Thingiverse, if you'd like to download and print your own!

Tuesday, February 18, 2014
3D Printed NAILS?!

Read more about the nails and the designers at the personalize blog.
Wednesday, February 12, 2014
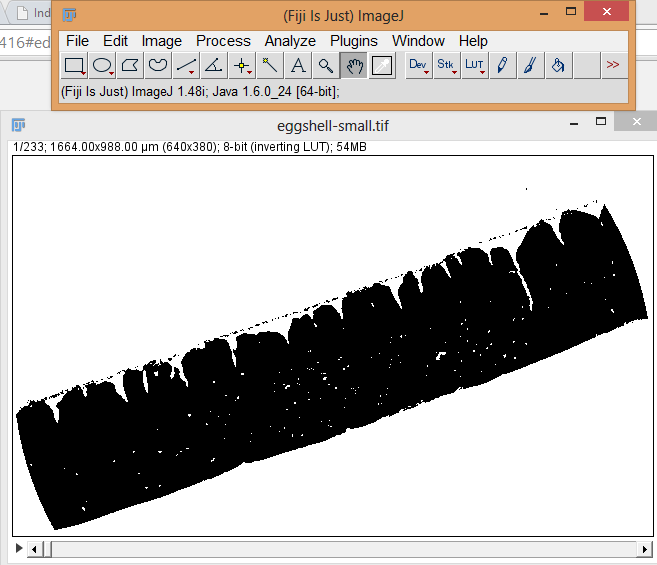
Converting .tiff data to .stl file

Here are the steps we took:
 1.You start out by going to FILE >> OPEN. and opening the tiff stack.
2. Then you create a binary from the tiff stack by going to PROCESS >> BINARY >> MAKE BINARY
It turns into this

3. If your model has holes in it that you want to fill you can go to PROCESS >> BINARY >> FILL HOLES. If your model still has holes then repeat step 3.


4. If you want to make your file smaller then go to PROCESS >> BINARY >> DILATE it will condense 4 pixels to 1 pixels. If you want it super small keep repeating step 4.


5. If their are stray pixels then go to PROCESS >> BINARY >> ERODE. If there are still pixels repeat step 5.


6. Once you complete steps 3-5 you go to PLUGINS >> 3D VIEWER. Don't worry if your computer freezes; this is a complicated process. A new window should come up.


7. To create the 3D surface you go to EDIT on the new window >> DISPLAY >> SURFACE Don't worry if your computer freezes; this is a complicated process. You should now have a 3D model!


8. To export you go to FILE >> EXPORT SURFACES >> STL(BINARYorASCII)
That is how you take an TIFF stack and covert it to an STL. I took the STL file and put into the Cube software but you can do what ever you want. NOTE: MOST PRINTERS CAN ONLY HANDLE FILES LESS THAN 50 MB. (If your file is too big, you can simplify / decimate it in MeshLab.)

 |
| (screenshot of reconstructed data from a different, not open-source software) |

Wednesday, February 5, 2014
"You can just print one!"
(1) Kid #1 looses tooth in science class. When she went to the office, the secretary had run out of little plastic treasure chests, so she got a ziploc bag.
(2) A little disappointed, Kid #1 returns to class. I build her a tooth box out of foil & duct tape (jokingly) as a consolation prize.
(3) Another kid quips, "You can just 3D print one!" [we all look at each other as the possibility sinks in]
(4) Kid #2 is so excited, she goes to the bathroom and pulls out HER loose tooth.
(5) We print two "molar boxes" in glow-in-the-dark filament (so "the tooth fairy can find it")!

Monday, February 3, 2014
Custom Thank You Pickle - TinkerCAD
Well, I made my first object in TinkerCAD. I have been so busy facilitating the kids, I have never actually sat down and created a project start to finish myself. Last week, my students and I took a field trip over to The Cultured Pickle Shop and we wanted to make them something to show our appreciation. The kids came up with the idea to 3D print a pickle, but were a little slow on the execution, so I picked up the slack.
TinkerCAD is so easy. The kids had hopped over to Thingiverse and downloaded a pickle STL to import into TinkerCAD, then I added a base and some letters. "Download for 3D Printing" >> STL and that's it! It doesn't even need to be cleaned up in netfabb or "healed" in the Cubify software!

The only green filament we had was our Cube's neon green. This is one intense pickle. I added it to Thingiverse, just in case anyone else will need a thank you pickle.... yep.

Sunday, February 2, 2014
Reflections from 3DPW - Part 2

REFLECTIONS FROM THE 3D PRINTER WORLD EXPO - PART II
By Abe Zukor and Alexander Blau
Yesterday, (February 1, 2014) a few students from the Black Pine Circle Maker Club went on a trip to Burbank, California to see the 3D Printer World Expo. The Expo took place at the Burbank Airport Marriott Hotel and Convention Center. As soon as we walked in the door, and we were greeted by a massive, 3D Printed Dinosaur Head.

It turns out that a company called Crea'Zaurus is 3D Printing dinosaur heads to try and replicate what they may have looked like. We thought this was genius, the dinosaur looked realistic and imposing, stationed in front of the conference.
At 9:00, the seminars began. The seminars were hosted by groups of people who talked about what they or their companies was doing with 3D Printers. We went to a few of these, one of which was called "The Future of Desktop 3D Printing". Here we learned about a new type of 3D Printer that we had not heard of before, called a Delta Printer. These printers are made differently from the kind that we use in our classroom. On "normal" printers, the Build Platform moves and operates on the Z Axis for the print, and the nozzle is the X and Y axis. But on Deltas, the Build Platform is completely stationary, and the Extruders move on the X, Y, and Z axis. This works by having the Extruder suspended above the Build Plate by three support beams, which can move the Extruder any direction horizontally, while also the supports can be moved both up and down on vertical rails.
After we had seen a few seminars, we looked at the Expo Floor itself. It was a massive room, filled to the brim with 3D Printers, Scanners, CAD Programs (mainly ZBrush), and various plastic models. We then proceeded to look around at all of the stuff for a good three hours. (It was really amazing stuff.) Here are some of the coolest things that we saw (pretty much everything that was printed in one piece, and yet moved):
 |
| A Wrench and a Crank or Something |
 |
| Claw Thing |
 |
| Ferris Wheel (Not in one piece, but still cool.) |
 |
| A 3D Printed Clock that Moves When You Spin the Gear |
Another thing that amazed us at the conference was the medical aspect of 3D printing. One interesting thing that was there was a 3D printed cast (we've posted about it before!). This cast would be much more comfortable because you could scratch under it. The wearer could also shower with the cast on. Plus, it just looks so pretty!
Reflections from 3DPW - Part 1

One highlight for us was spending time with Brook Drumm at the Printrbot booth. Brook was the one who helped us get started with 3D printing back in December 2011.
 |
| BPC kids with Brook Drumm, Printrbot |
 |
| Brook Drumm tells the story of the Robohand |
Brook shared with us a Robohand, worn by a girl in South Africa for 9 months until she outgrew it and had they had to print her a new one. You can read the story behind the first robohand, which is now even available on Thingiverse! Brook told us how he's worked with Richard van As (the inventor of the robohand) and Not Impossible Labs, a cool organization whose mission is to use "Technology for the sake of humanity." You can watch this inspiring video below, which was featured in the Organovo medical advances exhibit:
The kids were surprised to learn that Printrbot has a dual extrusion option, and is working on some triple extrusion designs. They even got a sneak peek at the upcoming improvements to the Printrbot Simple!
 |
| The kids get a sneak peek at upcoming Printrbot models |
"The medical stuff was maybe most interesting. I saw a story about this guy who had cancer and his face was, like, gone. Then they scanned his face and made a patch (a mirror image). It was new and I hadn't really seen that technology used for medical uses before." - Noah, 8th grade
A lot of the technology we've already seen. [The Expo floor] wasn't necessarily new showcase technology. But there was one booth that did showcase technology that I hadn't seen before. It was a company Sixense. [UPDATED 2.5.14: Their Kickstarter launched today.] They had used motion track technology they used in video games to make a tool that makes modeling in 3D a lot easier and is a new way to approach modeling - as close as we can get to modeling something with our own hands." - Isaac, 8th grade
"This first show [seemed to be] to show 3D printing to the general public. I'm hoping next year, once 3D printing has caught on more, that 3D Printer World Expo will be more of a show to release new upcoming printers." - Cole, 8th grade
"I liked a lot of the Stratasys booth cuz it had a lot of working mechanisms, like gears and stuff. Also, that electroplate Afinia stuff was cool, too, with the electroplated ABS plastic." - Morgan, 8th grade
Things we (I) will follow up with:
- Octoprint - Connect your printer to any small embedded and WiFi enabled device (such as the Raspberry Pi) and this open source software allows you operate your printer from any browser!
- Getting reading glasses for our Kinect
- GrabCAD - seems like this is the Thingiverse for engineers? Perhaps not useful for students at this time
- Teaching about patents in the curriculum. Especially now that I learned that, unlike copyright, there is no Fair Use with patents - no exception for home use, or personal use. I already teach the kids about Creative Commons, Copyright, and Fair Use, but I'll need to work in some patent awareness as these teens experiment in our remix culture.
Subscribe to:
Posts (Atom)