[UPDATE 10.15.18:
Chicken VR is now available on Steam. Note that you will need an HTC Vive in order to play it.]
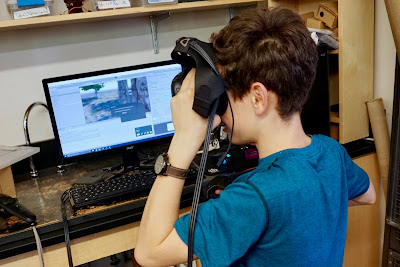
One week ago, we loaded our rented van with kids, chicken crafts, and our HTC Vive, and headed off to the San Mateo Maker Faire. Sunday night we returned with far fewer button-making materials, tired and happy kids, and an Editor's Choice blue ribbon for our project,
Chicken VR!
First, a little backstory on Chicken VR:
At Black Pine Circle School, we're obsessed with chickens. In the science room, there is a chicken calendar, multiple chicken posters, and each of our non-Chromebook computers are named after chicken breeds. The 7th grade science class hatches chickens just about every year, but these birds usually are returned to the farm after a couple of weeks. Until last year, when the garden educator and some students got together to build a chicken coop. After a 2017-year end ceremony, we now have chickens living on campus.
When we were brainstorming for East Bay Mini Maker Faire, we wanted something chicken-related, but also tech-related, with a maker element. We had recently bought our HTC Vive (a few months ago) and wanted to learn more about developing software for it. This is how we got the idea for Chicken VR. It's a first person chicken simulator in virtual reality. You can walk around, eat, drink, and lay eggs.
Our first step was research.
As with any good project, we wanted to see what was already out there. We searched the Internet and was momentarily crushed to discover that a Oculus Rift
Chicken Simulator already existed! Though it has some really interesting features, we knew we wanted to personalize our first-person chicken experience to match our chickens at BPC. Plus, the Vive would allow users to walk around in real space, instead of having to sit in a chair.
Another project,
Second Livestock, from Iowa State University assistant professor Austin Stewart "imagines how VR goggles could make chickens believe they’re free-range, even when they’re not. They can explore a virtual grassland, and with future iterations of Oculus, even peck at the ground and bob their heads around to take in the landscape at different angles." (via
TechCrunch) Strange, right?
There is also a
Virtual Chicken Coop, "the most realistic chicken coop simulator on scratch, currently featuring 10 different breeds of chickens!"
But, we believed we had something different. Besides, can there be too much Chicken VR?
Building Chicken VR
Originally, we brainstormed a design where the trackers would actually be your feet. However, we realized that if we wanted users to teleport, this presents a problem. We thought about getting four controllers, and eventually settled on the design with two controllers held in hands.
We used TinkerCAD to create the wings out of simple shapes. These wings are attached to the controllers and you can flap and teleport. We used Fusion 360 to create the virtual model modeled off our actual school coop.
 |
| Designing the coop in Fusion 360 |
Finally, we used Unity to design the environment, adding terrain and taking full advantage of the "Mass Place Trees" button before applying various textures to complete the look. We worked on the physics of the wings and eventually added rotation to body movement and made sure the body resizes based on head height to accommodate a wide range of users.
We added teleportation and a health, water, and food system with HealthTracker script. In Chicken VR 1.0 (which we brought to the East Bay Mini Maker Faire) when the beak touched food or water, your scores would increase and there was a dehydration timer involved as well as a health loss if food or water is empty.
Version 1: 2017 East Bay Mini-Maker Faire

We showed an initial prototype version at East Bay Mini Maker Faire and got feedback from a survey. Some of the responses were "interesting..." Here are some examples:
- It should be less 3d
- Make it more reelistik
- You should be abel to lay eggs
- Other chicken friends for me to be with
- Sounds
Version 2: 2018 San Mateo Maker Faire
Before Bay Area Maker Faire (a few weeks before), we removed the health, food, and water tracking systems and added some new features. Now you can lay eggs when you pull the trigger and fly. There's even a purple hand that follows you around and feeds you a worm periodically. There are new sounds, which include "chicken eating," "chicken drinking," "chicken background," "slurp," and "flap."
Besides Chicken VR (which often had long lines) the maker club kids had additional chicken crafts available. People could make chicken buttons, or other chicken-related crafts. The button backgrounds came from a coloring book titled
Exotic Chickens: Coloring for Everyone (Creative Stress Relieving Adult Coloring Book Series). The button machines were, as usual, a big hit with kids and adults alike.
We had a great weekend helping people experience what it might be like to be a chicken.
Want to keep updated on Chicken VR? Leave your email address here. You can also "like" BPC Maker Club on Instagram and Twitter (@bpcmakerclub) and Facebook (
@3dPrintinginK12). We tend to share in bursts, like on summer vacation when there is time to catch up with posts. :)


